The LCD Display is now very commonly used. To begin with we will be using the botuniverse LCD display.
In the LCD Display, we have 16 columns & 2 rows with each block having 5×8 pixels.
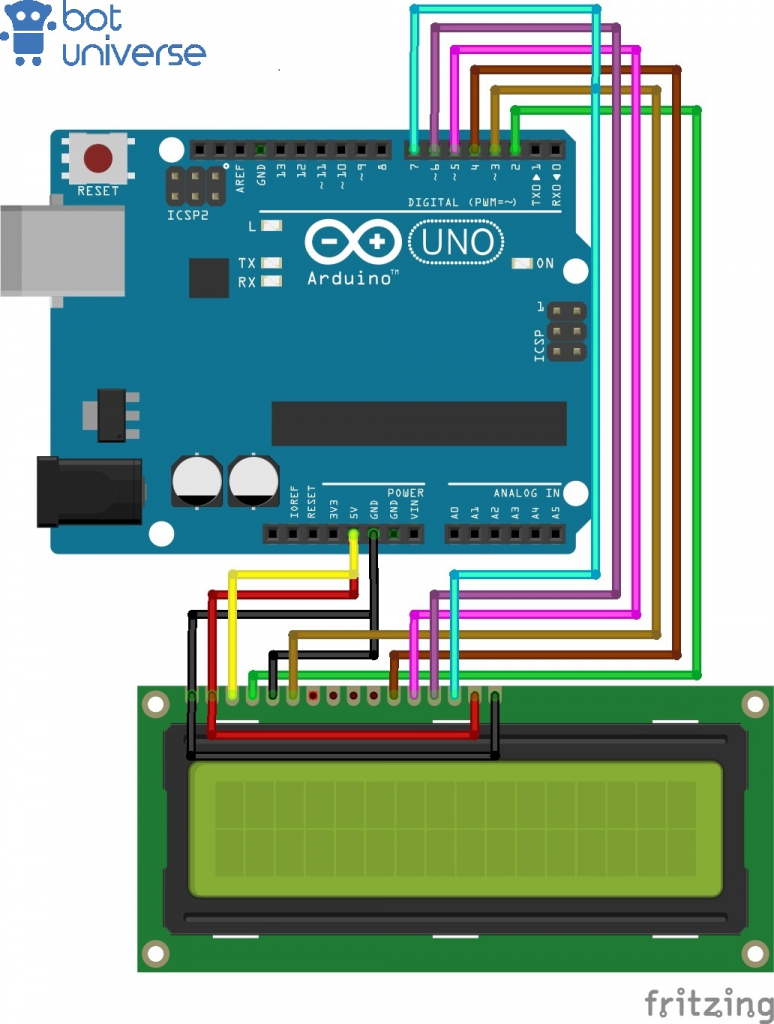
Let’s Understand how the pins work:
- VSS / GND – This is the negative terminal & has to be connected to the GND pin of UNO
- VDD / VCC – This is the positive terminal & has to be connected to the 5v pin of the UNO
- VO – This is used to control the display contrast by varying its value
- RS – This is also known as the register select pin. When it is low, it is understood that we are not sending data i.e. characters to it & doing other actions like clearing the scroll or changing the cursor location. When it is high, we are sending characters to the LCD using the pins D0 – D7.
- R/W – Also known as the Read & Write pin. We can control whether to read or to write by varying its value from 1 to 0 & vice-versa
- E – Also known as the Enable pin. It works like a sync button, like ctrl+s
- DB0 – DB7 – These pins go into D0 – D7. These pins are used to transit data to the LCD display.
- A – Anode(+) Pin for the LCD Backlight
- C – Cathode(-) Pin for the LCD Backlight
The two modes of the RS pin
- Command Mode – RS pin is low ; commands like set cursor , clear screen
- Data Mode – RS pin is high ; data is being set through the pins.
The two modes of the R/W pin
- Read Mode – R/W is high
- Write Mode – R/W is low
//botuniverse.in
#include <LiquidCrystal.h> // Including the library
LiquidCrystal lcd = LiquidCrystal(2, 3, 4, 5, 6, 7); // Creating an LCD Object with the
//requred parameters (Pins)

void setup() {
  lcd.begin(16, 2); //Specifying the LCD's number of columns & rows
}
void loop() {
  lcd.setCursor(2, 0); //Setting the cursor on the third column & first row.
  //Counting starts at one
  lcd.print("Hello World!"); //Printing Hello World
  lcd.setCursor(2, 1); // Setting the curson on the third column & second row
  lcd.print("LCD tutorial"); //Printing LCD tutorial
}
Attached is a video for help:
lcd.clear()
As the name suggests, this function does nothing more than just clear the display
lcd.blink()
As the name suggests, it will start blinking the location of the LCD cursor.
lcd.noBlink()
As the name suggests, it will stop the blinking LCD cursor.
lcd.cursor()
As the name suggests, it will display an undersocre (_) under the place where the cursor is going to write on.
lcd.noCursor()
As the name suggests it will hide the cursor
Attached is another sample code to get you kickstarted
#include <LiquidCrystal.h> //Including the library
LiquidCrystal lcd = LiquidCrystal(2,3,4,5,6,7); //Making an object

void setup(){
    lcd.begin(16,2); // Determining the number of columns & rows
}

void loop(){
    lcd.print("Botuniverse"); // Prints "Botuniverse" on lcd
    delay(3000); // Makes the program wait for 3 seconds
    lcd.cursor(); // Observe where the cursor is
    delay(2000); // Makes the program wait for 2 seconds
    lcd.setCursor(2,1); // Sets the location of the cursor. Observe where the cursor is
    lcd.print("LCD Tutorial") // Prints LCD Tutorial
    delay(3000); // Makes the program wait for 3 seconds
    lcd.clear(); //See the LCD get completely empty
    lcd.blink(); //Observe which box is blinking
    delay(4000); //Makes the program wait for 4000 seconds
    lcd.setCursor(7,1); //Now see which box is blinking
    delay(3000);
    lcd.noBlink(); //Closing the program *ALL the other lines
    lcd.noCursor();
    lcd.clear();
}
I hope the code was self-explanatory & so was the post, in the next part I will be covering custom characters. If you have any suggestions / ideas or doubts you can ask it in the comments section below or mail me at ideas@botuniverse.in .
Leave a Reply
You must be logged in to post a comment.
Pingback:How to use a LCD Part 2 – Bot Universe
Pingback:Anonymous